BEST prompts FOR Nano Banana
What is Nano Banana?
Don’t be fooled by its playful name — Nano Banana is Google’s most powerful image generation model yet. Officially called Gemini 2.5 Flash Image, it lets you:Blend multiple images into one
Maintain character consistency across outputs
Edit with precision using simple text commands
Find more details here: Gemini 2.5 Image (Nano Banana) Beats All Image Editors!
Now that you know what makes this model special, let’s move to the exciting part: prompt templates you can use to get the most out of Nano Banana.
Also Read: 4 Ways to Access Nano Banana for Free
10 Prompts to Try on Nano Banana: Image Generation
Nano Banana excels at both image generation and editing. In this blog, we’ll share 10 prompt templates for each. You can simply copy them, add your own details, and start creating right away.
Task 1: Generating Realistic Images
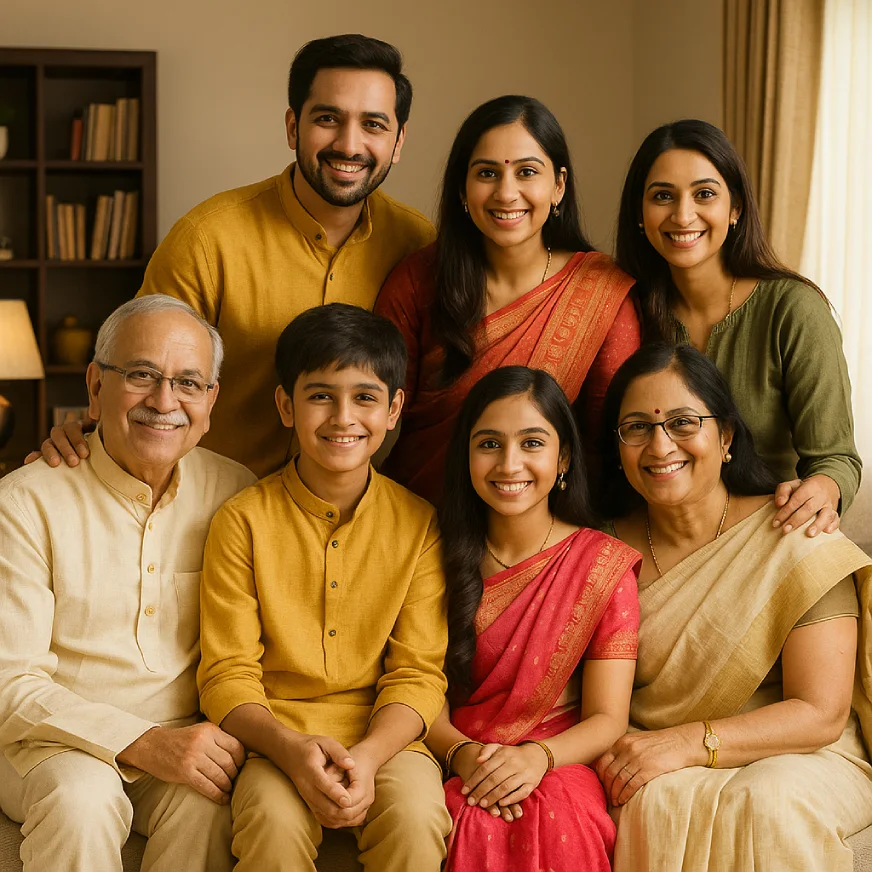
Prompt template: A photorealistic [shot type] of [subject], [action or expression], set in [environment]. The scene is illuminated by [lighting description], creating a [mood] atmosphere. Captured with a [camera/lens details], emphasizing [key textures and details]. The image should be in a [aspect ratio] format.
Output:
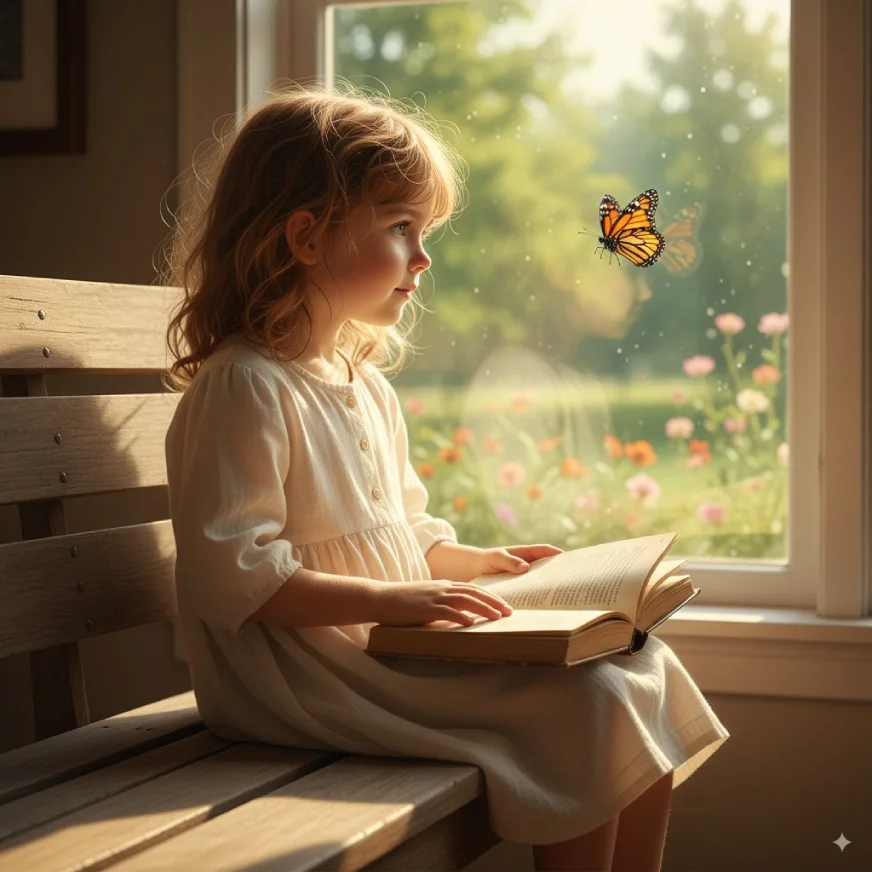
Prompt I used: A photorealistic medium shot of a young girl sitting on a wooden bench by a window, gazing at a butterfly fluttering outside. The scene is set in a cozy room with an open book resting on her lap and summer greenery visible beyond the window. The scene is illuminated by warm golden sunlight streaming through the window, creating a serene and dreamy atmosphere. Captured with a 50mm f/1.8 lens on a full-frame camera, emphasizing the soft textures of her hair, the wooden bench, the delicate butterfly wings, and the light falling across the book’s pages. The image should be in a 16:9 format.
Pro tip: You can now use this image and edit it to be a part of it! Just follow this prompt with another prompt – replace the girl in the image with this and add your image to the prompt!
Task 2: Sequential Art (Comic Panel / Storyboard)
Prompt Template: A single comic book panel in a [art style] style. In the foreground, [character description and action]. In the background, [setting details]. The panel has a [dialogue/caption box] with the text “[Text]”. The lighting creates a [mood] mood. [Aspect ratio].
Output:
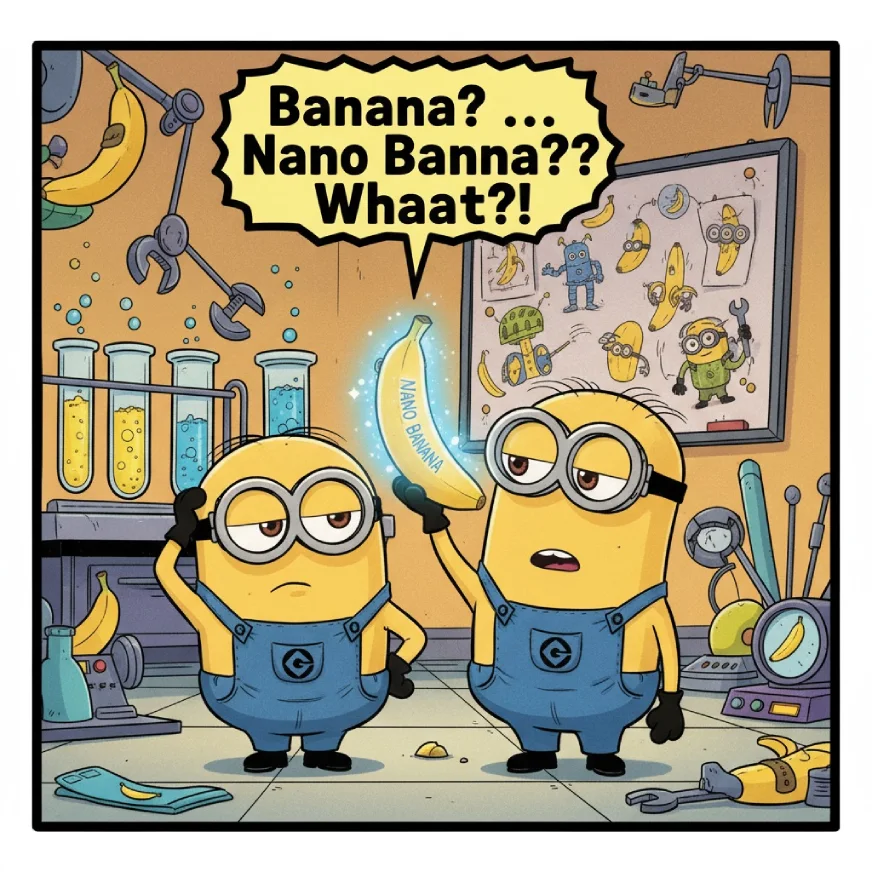
Prompt I used: A single comic book panel in a bright, cartoonish, Illumination-style. In the foreground, two Minions stand side by side—one scratching his head in confusion while the other holds up a glowing, futuristic banana labeled “Nano Banana.” In the background, a playful lab setting with banana gadgets, test tubes, and doodles on a whiteboard showing bananas turning into strange high-tech objects. The panel has a dialogue bubble with the text: “Banana? … Nano Banana?? Whaaat?!” The lighting creates a fun, curious, and mischievous mood. Aspect ratio: 4:3.
Pro tip: Follow this prompt with the following prompt: Create a next scene where the same minions are reading about nano bananas on the computer. You can do this as many times as you want and generate an entire comic book/strip!
Task 3: Stylized Illustrations & Stickers
A [style] sticker of a [subject], featuring [key characteristics] and a [color palette]. The design should have [line style] and [shading style]. The background must be white.
Output:
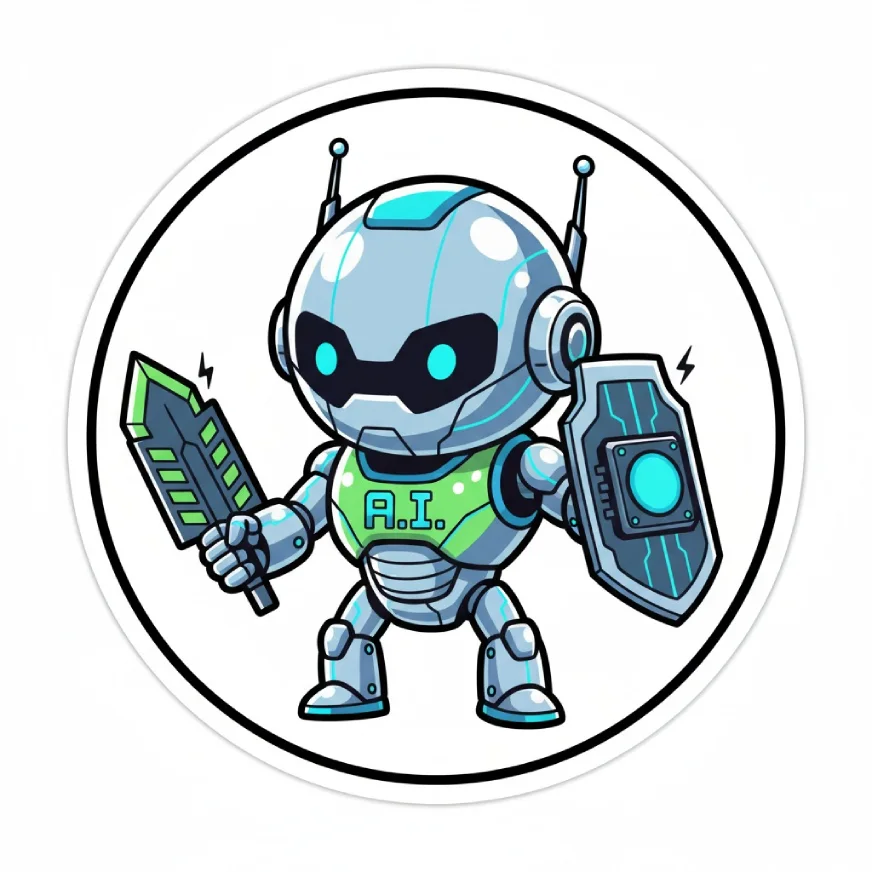
Prompt I Used: A futuristic cartoon sticker of an AI robot mascot, featuring small GPU chips held like weapons in its hands and a sleek metallic + neon blue/green color palette. The design should have bold, clean outlines and flat, minimal shading to keep it sticker-friendly. The background must be white.
Pro tip: You can use these as stickers or generate your social media avatars using this prompt!
Task 4: Add Accurate Text
Prompt Template: Create a [image type] for [brand/concept] with the text “[text to render]” in a [font style]. The design should be [style description], with a [color scheme].
Output:
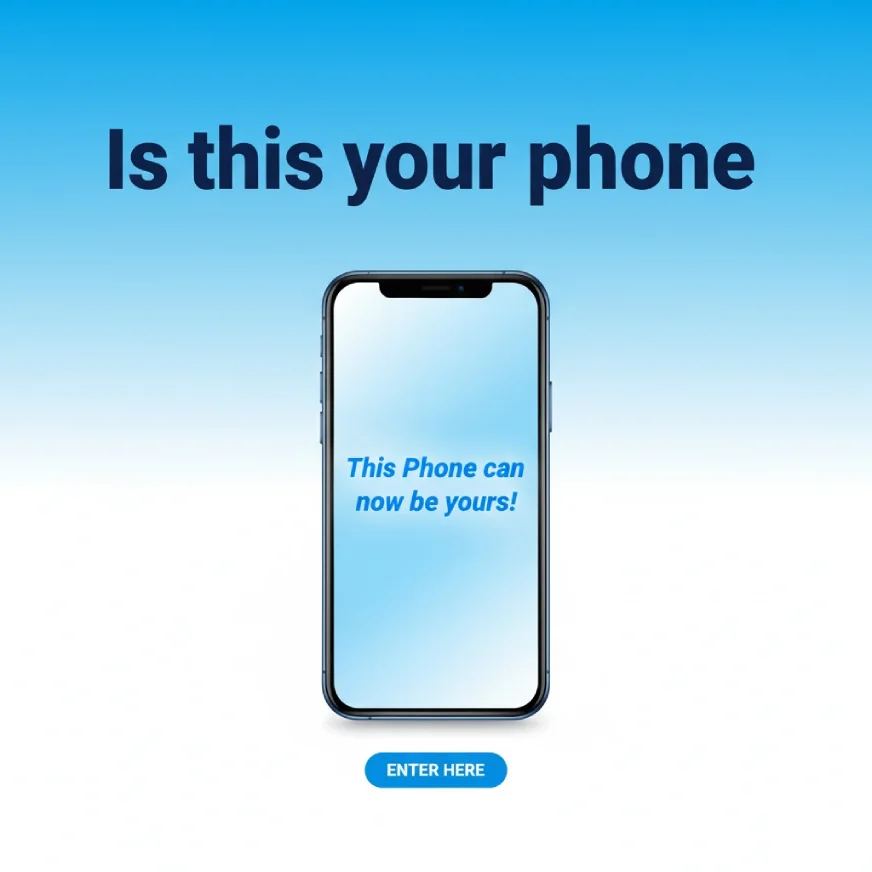
Prompt I used: Create a banner for a phone giveaway concept with the text “Is this your phone” in a bold, modern sans-serif font. The design should be clean and eye-catching, with a bright gradient blue and white color scheme. Below the heading, it features an illustrated smartphone. Inside the phone screen, render the text “This Phone can now be yours!” in a sleek italic font, making it pop.
Pro tip: You can use this to create images that are self-explanatory, useful for brand campaigns or PPTs.
Task 5: Product Mockups
Prompt Template: A high-resolution, studio-lit product photograph of a [product description] on a [background surface/description]. The lighting is a [lighting setup, e.g., three-point softbox setup] to [lighting purpose]. The camera angle is a [angle type] to showcase [specific feature]. Ultra-realistic, with sharp focus on [key detail]. [Aspect ratio].
Output:
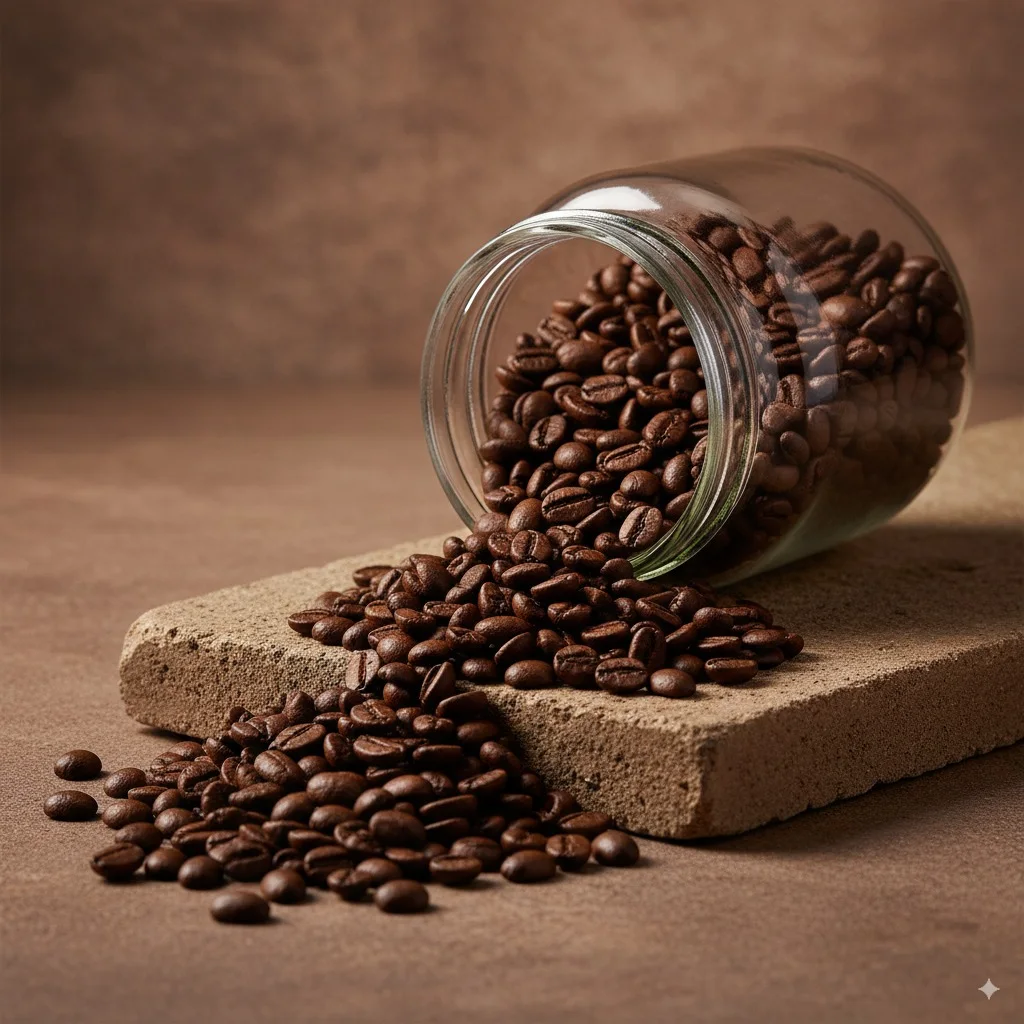
Prompt I used: A high-resolution, studio-lit product photograph of a glass jar of coffee beans spilling onto a stone slab on a textured stone background surface in earthy browns. The lighting is a three-point softbox setup to highlight the richness of the coffee beans and create soft, natural shadows. The camera angle is a slightly low, front-facing angle to showcase the coffee jar as the focal point while capturing the flow of beans onto the slab. Ultra-realistic, with sharp focus on the glass jar and the glossy textures of the beans. 4:5 aspect ratio.
Pro tip: Use this to generate images of your product to sell them on any e-marketplace or social media page.
Task 6: Sketch to Image
Prompt Template: Convert this sketch into a high-quality realistic image, ensuring a lifelike appearance with detailed textures and lighting. Add a [background description] (e.g., runway, cityscape, forest, beach, etc.). The aspect ratio of the image should be [aspect ratio, e.g., 9:16, 4:3]. The image should feel as though it was taken directly from the front, with the camera capturing both the background and the [subject] (e.g., model, person, character) uniformly, ensuring balanced focus on both elements.
Output:

Prompt I used: Convert this sketch into an actual high-quality image, and add a runway in the background. The aspect ratio of the image should be 9:16. The image should feel like it’s taken right from the front, with the camera capturing the background as well as the model uniformly.
Pro tip: You can use this to bring any of your sketches to life and see how they would look in the real world.
Task 7: Try an Outfit
Prompt Template: Put the following outfit on the person in the image and give me the overall look. Do not miss any item from the outfit, and do not change the person’s pose. Ensure the outfit is accurately represented, including all specified details (e.g., accessories, shoes, outerwear), and the look should feel cohesive. Maintain the original environment and lighting of the image, ensuring the outfit blends naturally into the scene.
Output:
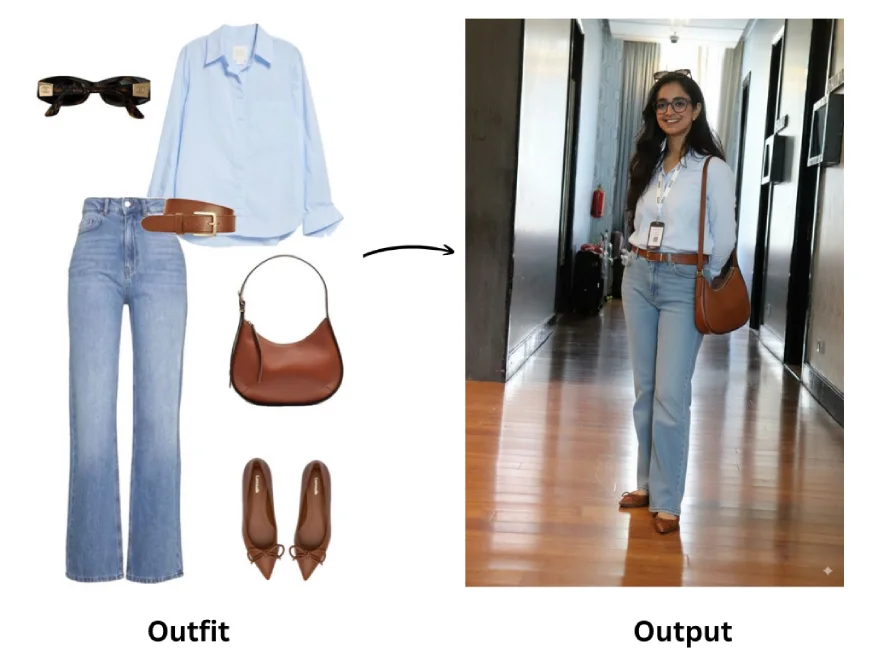
Prompt I used: Put the following outfit consisting of shirt, bag, jeans, heels and sunglasses on the person in the image and the look should feel cohesive. Maintain the original environment and lighting of the image, ensuring the outfit blends naturally into the scene..
Pro tip: Before making a purchase online, you can use this prompt to see how that outfit actually looks on you.
Task 8: Create Multiple Poses
Prompt Template: Create multiple (singing/dancing/standing…) poses using the provided illustration. Ensure that each pose is clearly labeled with the corresponding name or description. The poses should be evenly spaced and aligned across the image, with an equidistant layout for clarity and balance. Each pose should be represented in a natural, anatomically correct form and should have a clear, readable label placed near or below the figure. The overall layout should be neat and visually balanced, with enough space between each pose to make them easily distinguishable.
Output:
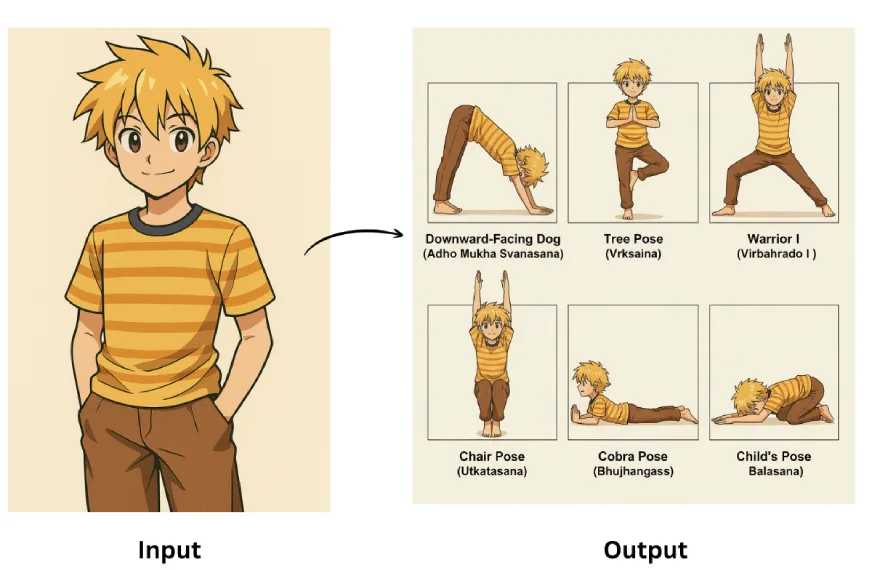
Prompt I used: Create multiple yoga poses using the given illustration. Ensure that each pose is clearly labeled with the corresponding name or description. The poses should be evenly spaced and aligned across the image, with an equidistant layout for clarity and balance. Each pose should be represented in a natural, anatomically correct form and should have a clear, readable label placed near or below the figure. The overall layout should be neat and visually balanced, with enough space between each pose to make them easily distinguishable.
Pro tip: Use this for social media, you can create multiple poses using a single image!
Task 9: Ingredients to Dish
Prompt Template: Here are the items available: [List of items]. Based on these items, create an image of a [type of object/scene] that can be made or represented by combining them. The composition should make logical sense, considering the relationship between the items. Ensure the image is [visual style], with [specific details] such as [texture/appearance]. The setting or background should complement the [context or theme], and the final image should be [aesthetic quality], with appropriate proportions and clear placement of each item.
Output:

Prompt I used: Here are the ingredients available: tomatoes, garlic, olive oil, basil, pasta. Based on these ingredients, create an image of a dish that can be made using them. The composition should make logical sense, considering the relationship between the ingredients. Ensure the image is vibrant, with rich textures such as the glossy sheen of olive oil and fresh basil leaves. The setting or background should complement the Italian culinary context, and the final image should be mouthwatering, with appropriate proportions of the ingredients arranged to look appetizing.
Pro tip: share your story board and makeit come alive using nano banana.
Task 10: Location to Architecture
Prompt Template: Take the [location/landmark name] and create an isometric image of this [landmark/building only] in the style of a [specific style]. The design should focus on capturing the key features of the landmark while incorporating the characteristics of the chosen style, such as [specific design elements]. Ensure the final image emphasizes the [unique features of the landmark] and maintains an accurate, visually balanced isometric perspective. The background can be kept minimal or [specific background details] to highlight the landmark in its new style.
Output:
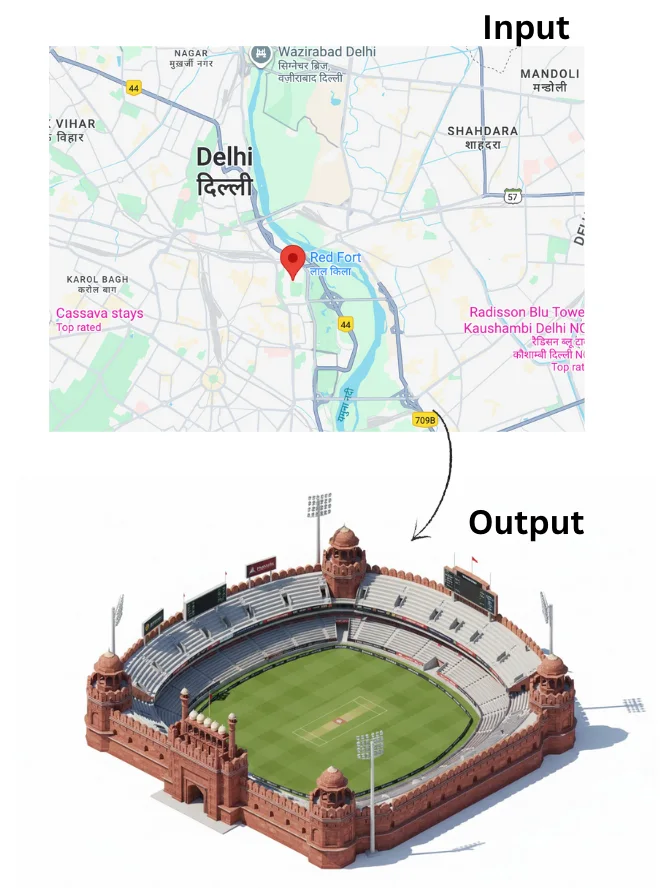
Prompt I Used: Take the [location/landmark name] and create an isometric image of this [landmark/building only] in the style of a cricket stadium. The design should focus on capturing the key features of the [landmark/building], while incorporating elements of a cricket stadium, such as seating areas, floodlights, and a central field. Ensure the final image emphasizes the [unique features of the landmark/building] and maintains an accurate isometric perspective. The background can be kept minimal or feature [specific background elements] to highlight the landmark in its new cricket stadium context.
Pro tip: Share a location and visualize it in different ways to make your ads more compelling.
These were a few of many possible prompts that you can try with Nano Banana for image generation. Now let’s talk about Image Editing.
5 Prompts to Try on Nano Banana: Image Editing
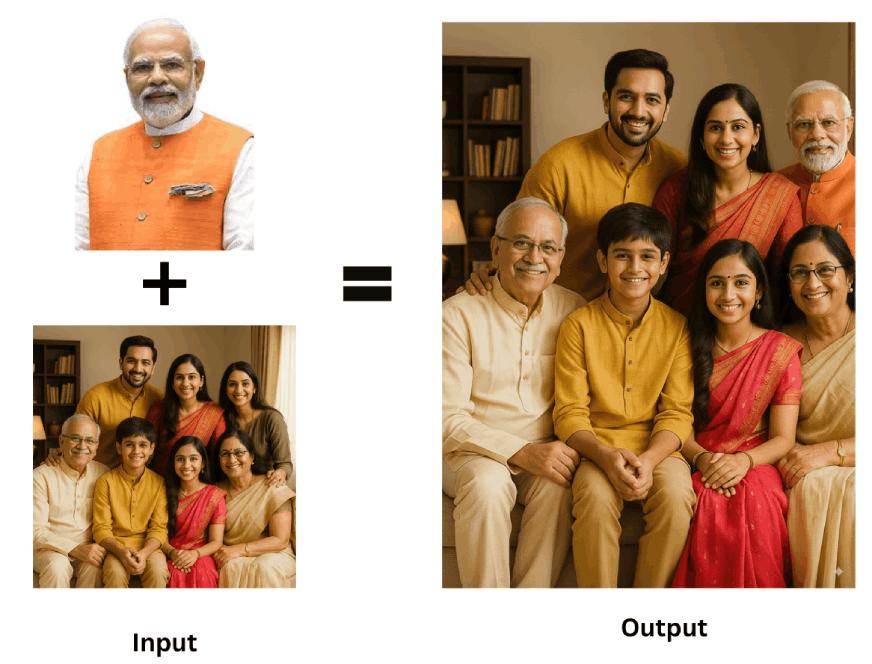
For Image editing tasks, I will work with the same image for all the tasks.
Reference Image:
Task 1: Add/Remove Elements from an Image.
Prompt: From the given image remove the wooden book frame at the back and replace it with an oil colour painting of a running horse with a wooden frame.
Output:
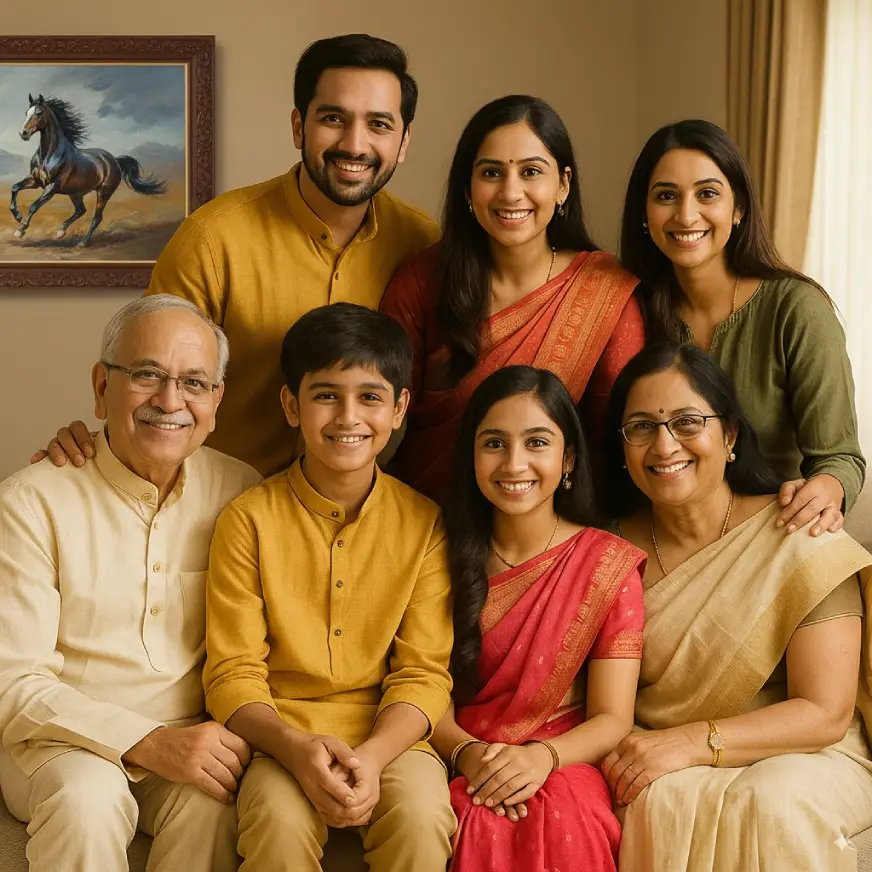
Pro tip: This feature is great for brand placements, if you forgot to add your logo or product, add it using this prompt.
Task 2: Add/Remove People from an Image
Prompt: Remove the girl wearing green top on the right side corner of the image and replace her with the guy in the other picture posing same as the girl did and looking like a part of the picture.
Output:
Pro tip: If any of your friend or family member could not make it for a trip or an outing, you can now, do some “nano banana” magic to make them a part of your memories.
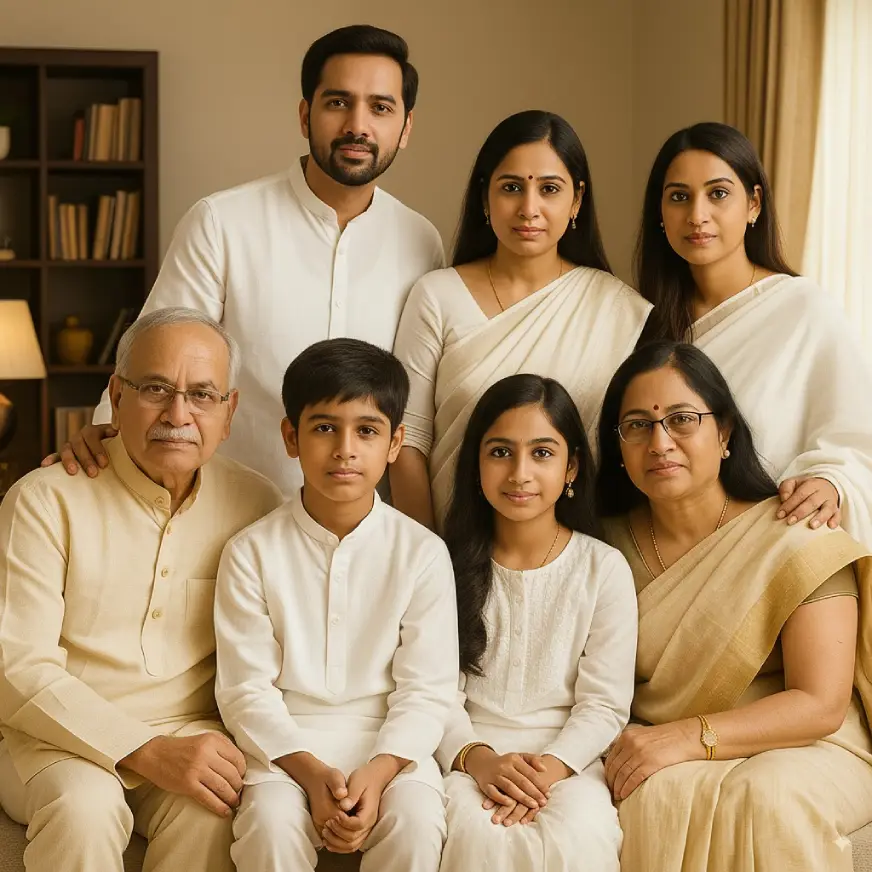
Task 3: Add Text in the Images
Prompt: In the image of the Indian joint family sitting in the living room, clearly add name labels inside semi-transparent text boxes (white text on a black semi-transparent rectangle). Place each label directly in front of the correct person (near chest/waist level), ensuring no overlap with faces.
For the three standing people (from left to right), add the names: Raj, Ritu, and Seema.
For the four sitting people (from left to right), add the names: Kishore, Ayaan, Noor, and Hema.
The names should be centered in the boxes, bold, and highly legible, contrasting well with the background.
Output:
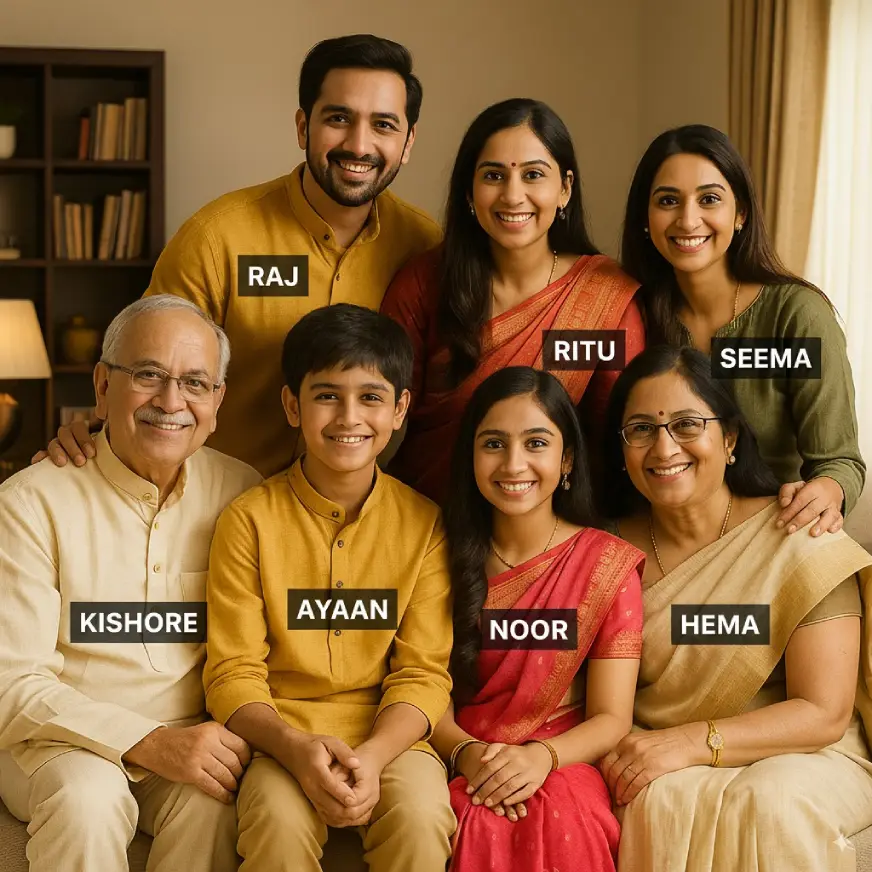
Pro tip: Now this is a useful feature especially for creating PPTs and social media posts.
Task 4: Changing Expressions
Prompt: Change the expressions of all the members in this image to sad, heartbroken, almost to tears and change their clothes to white or neutral shades
Output:
Pro tip: Generate differnet images by mentioning different kinds of expressions and clothes to bring out different scenes and stitch them together to create a video.
Task 5: Changing Background
Prompt: In the image, change the background to be festive, with elements like decorative lights, floral arrangements, and colorful drapes. The overall mood should be joyful and energetic, resembling a real wedding celebration with warm, soft lighting.
Output:
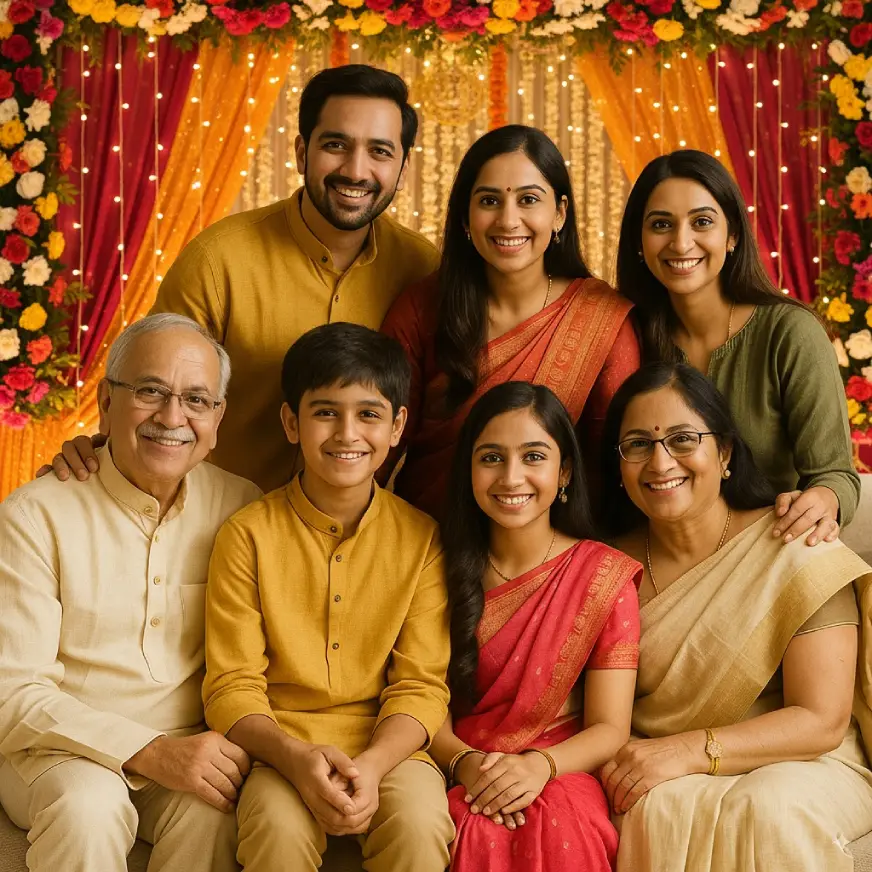
Pro tip: Paying expensive photo editors? Maybe give nano banana a try first!
Tips to Use Nano Banana
I have tried almost all latest image generation models but the output that you get from Gemini 2.5 flash aka nana banana are unmatched. What makes them even better is the speed at which these get images get generated and the ease with which the changes are incorporated. All said and done, Nano banana is afterall an LLM and hence requires to be prompted. Here are some tips that you can keep in mind while prompting nano banana to get the best from the best.
Tip 1: Make your ask clear
Tell the model exactly what you want and how you want it.
Prompt: I need to see a sky blue coloured T shirt with white floral hydrangeas on it paired with White jeans ripped near the knees with a pair of transparent heels, a deep blue shoulder bag and a pair of harry potter sun glasses. Put each piece at the relevant position and the image should be taken from the front in pinterest style. Create this image.
Result:
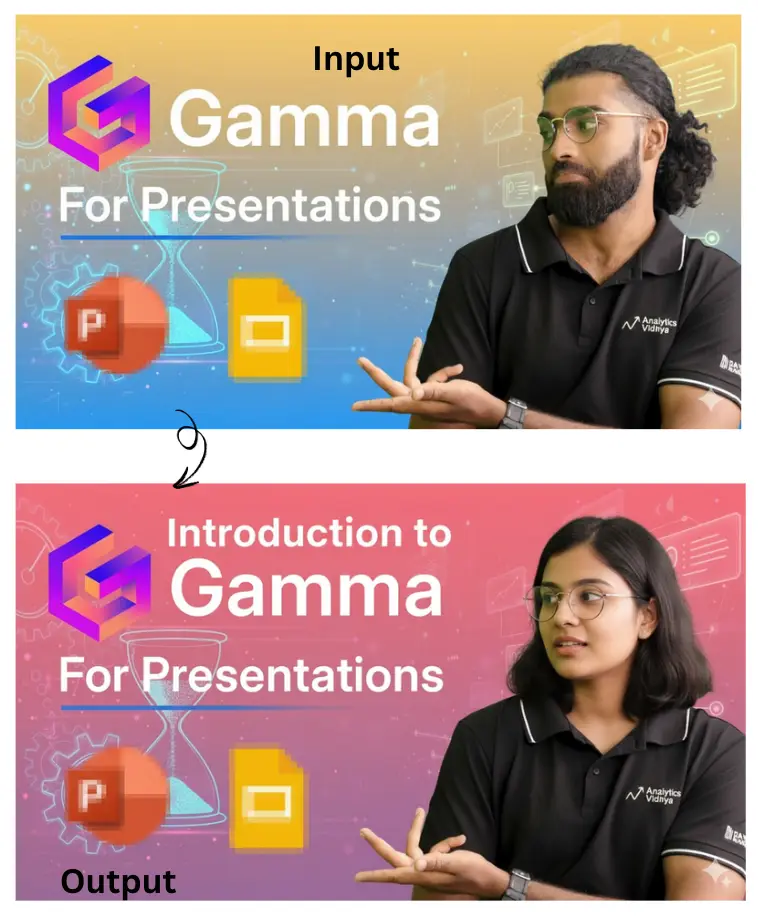
Tip 2: Break down into steps
When you want multiple changes in an image, break it down into simple steps.
Prompt: I want to see the following changes:
(i) Change the guy in the image by a girl with the same expression and pose.
(ii) Replace the existing background with lighter hues of pink and red
(iii) Add the text: “Introduction to” at the top of the image.
Result:
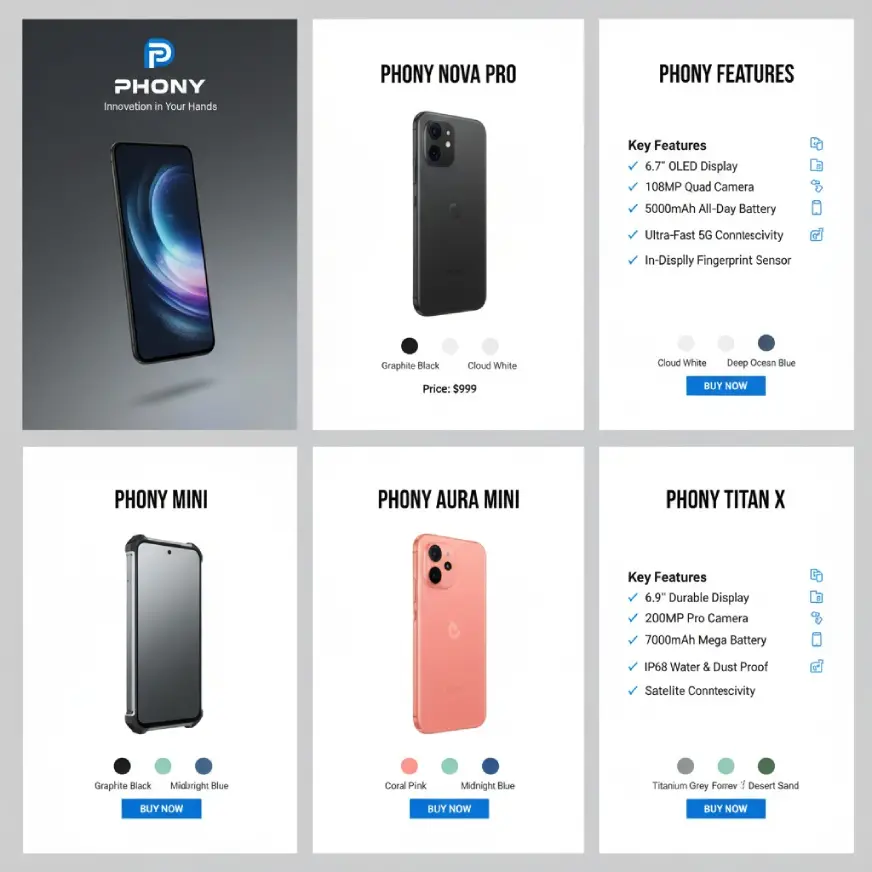
Tip 3: Be detailed
LLMs lack imagination (phewww.. ) so instead of relying on them to think on all critical elements in the image that you want, you need to add those details. So make sure to give as much context in your prompts as possible.
Prompt: Create a product catalog for Phoney showcasing its smartphones with the following:Cover Page:
Display the Phoney logo and tagline “Innovation in Your Hands”.
Use a modern, minimalist design with a hero image of the latest phone.
Product Pages (One per Phone Model):
Phone Name in bold at the top.
High-quality image of the phone with a clean background.
Key Features in bullet points with icons (e.g., screen size, camera, battery).
Show color variants and price clearly.
Include a CTA (e.g., “Buy Now”).
Design Style:
Grid layout with Phoney’s brand colors (black, white, and accent colors).
Modern sans-serif fonts for headings and body text.
High-quality icons and images for features.
Result:
Keep these points in mind and let your creativity flow with Google’s Nano Banana.

اشترك في بريدنا الالكتروني لتتوصل باشعار فور نشر موضوع جديد
0 الرد على "BEST prompts FOR Nano Banana "
إرسال تعليق